Tips for Highlighting Your Creative Professional Activity
We have recently enjoyed the experience of preparing our promotions dossier. Here are our top five tips for highlighting your Creative Professional Activity (CPA). (A cautionary note: our promotion files are still under review).
1. Write Your Candidate’s statement first
The Candidate’s Statement is your CPA roadmap. You must be clear on your roadmap before WebCV can help to show your progress.
Your Candidate’s Statement should answer the following questions:
- What is the focus of your CPA?
- What do you consider your major CPA accomplishments since your initial appointment (or last appointment)?
- What impact do you think your CPA has had or will have?
- What is the evidence of this CPA impact?
- What are your CPA goals for the next five years?
Think broadly about impact. Impact is more than peer–reviewed publications and grants. Impact means patients receive better care because of your contributions.* This is no time to be modest. We all know that there are many colleagues involved in any CPA, but this is your chance to say what you did.
You will need a few writing sessions until you are satisfied. Set aside three 30 minute sessions over one week to get it right. Show it to your trusted mentors and your division head. Show it to a non-medical person who knows nothing about your work.
2. Enter your CPA statement and CPA titles into your WebCV**
- Use Mozilla Firefox or Internet Explorer version 6, 7 or 8 to avoid hassles. If you insist on using another browser some things may not work properly. WebCV FAQ
- Go to “All Activities” View
- Click on the “Creative Professional Activity” heading
- Under the “Introduction to CPA” sub-heading you can enter the relevant aspects of your Candidate’s Statement. Your Candidate’s Statement is now so good you can simply cut and paste!
- Click on the “Creative Professional Activities” sub-heading
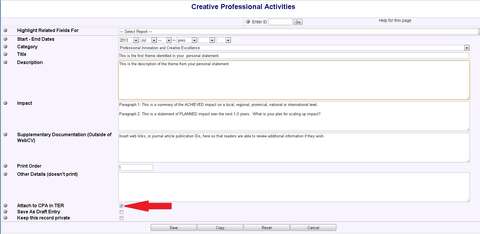
- Enter each creative professional activity title here, with short descriptions from your Candidate’s Statement.
- It is fine to have only one title. It is better to list fewer titles and demonstrate how well your activities link to one another.
- Emphasize your most impactful themes first. You can change the order that your CPA titles appear in your dossier by changing the “Print Order” – the number “1” means you want it to appear first.

FIGURE 1: Entering CPA titles into WebCV. Choose “Attach to CPA in TER” box (red arrow) if your CPA title has some educational components. This will allow you to attach any relevant activity to your Teaching and Education Report (TER).
3. You can now attach every related teaching, research and administrative activity to your CPA
- Add a new activity by clicking the “Add new” button. If the new activity is similar to one that you already entered, you can also find the similar activity and click the “Copy” button, then make the necessary changes to create a new entry.
- At the bottom of the window that pops up, there is an “Attach to CPA” checkbox – check it to link this activity to your CPA dossier.
- Beneath this, you will now see listed all of the CPA titles that you have entered. Check all CPA titles that are relevant. Make sure that at least one CPA title is checked if you have linked the activity to your CPA dossier.
- Link your activities to your CPA title(s) in real time – it’s the most reliable way to make sure that you capture everything.
4. What if I forgot to assign activities to my CPA dossier? Is there an easy way to catch up?
We realize that you may already have a number of activities entered in your WebCV that are not yet assigned to a CPA title.
- Choose an activity from your “All Activities” view.
- Set your grid columns to show the “Link to CPA” and “Attached CPA Title(s)” columns. This will allow you to visually scan your activities and see what has (or has not been) linked to your CPA dossier.
- Click on “Grid Columns.”
- Make sure the “Attach to CPA” checkbox is checked.
- Make sure the “Attached CPA Title(s)” checkbox is also checked.
- Click on refresh to see the updated table.
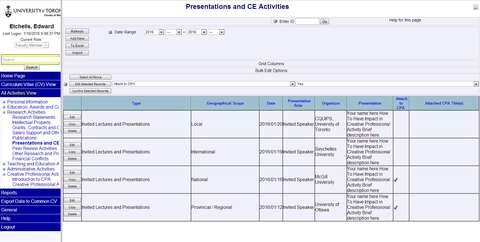
- Now you can bulk edit items that you wish to link to your CPA report.*** (Figure 2)
- Click on “Bulk Edit” at the top of the table.
- Choose “Attach to CPA” from the “---Select Column To Edit---“ drop down list (the one on the left) next to the “Edit Selected Records” button.
- Choose “Yes” from the drop down list on the right.
- Hold CTRL and press the SPACE bar (or click the row with your mouse) to select the activities that you want to attach to CPA – selected items will be highlighted in yellow.
- Once you have selected all of the activities to attach to your CPA dossier, click the “Edit Selected Records” button to confirm your selection. After the screen refreshes you should see a check mark in the “Attach to CPA” column in the rows that you selected.

FIGURE 2: This is your list of presentations and CE activities. You have clicked on the column heading “Attach to CPA” once (or twice); this has sorted the records that are not yet attached and bring them to the top of the grid. You now wish to attach the top two entries to your CPA report. In the figure, you have clicked on “Bulk Edit”, chosen “Attach to CPA” on the left-hand drop-down list, and chosen “Yes” from the right-hand drop-down list. Next, you will hold the CTRL button down while clicking on the top two rows you wish to attach to your CPA report. Click the “Edit Selected Records” to attach to CPA.
Unfortunately, there is no bulk editing for attaching an activity to a specific CPA title – this needs to be done manually.
- Click the “Attach to CPA” column heading once (or twice). This will sort the activities so that all the activities with a checkmark in the “Attach to CPA” column appear at the top.
- Now look at the “Attached CPA Title(s)” column. In Figure 2, the third activity from the top is attached to CPA because there is a checkmark, but there is no theme assigned because the cell to the right is blank.
- Choose “Edit.”
- Link the activity to a specific CPA title.
- Choose “Save.”
5. Generate and proofread your CPA and TER report
- You never really know what the reports will look like until you view them.
- Generate the reports and proofread.
- You will identify some activities that are not properly linked to a CPA title, which can easily be fixed. These are ‘orphan’ activities that appear at the end of your CPA report under the heading “Related Creative Professional Activities” with the disclaimer “Note: Following activities are linked to CPA report but not attached to a CPA record.”
- Go back to step 4 to find these orphaned activities and make sure that they are assigned to a CPA title.
References
*University of Toronto Faculty of Medicine Manual for Academic Promotion to Associate and Full professor. Pages 14-18. http://medicine.utoronto.ca/sites/default/files/ManualforAcademicPromotion2015.pdf. Accessed January 18th 2016.
**Attaching records to CPA. http://webcv.utoronto.ca/sites/default/files/Attach_to_CPA.pdf. Accessed January 18th 2016.
***Tips and Tricks. http://webcv.utoronto.ca/sites/default/files/Tips and Tricks-v5.1c.pdf. Accessed January 18th 2016.
